Nowadays when one is hiking in Europe or the States it is more unusual to see
walkers without trekking poles than with them, and with good reason. A recent survey
revealed that 90% of thru-hikers on the Appalachian Trail (3515 km between Georgia &
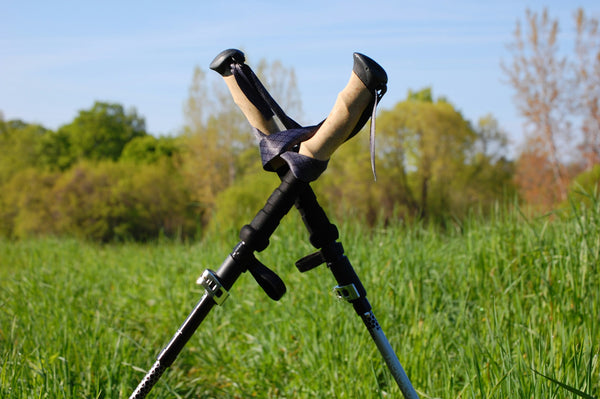
Maine, USA) listed poles as part of their essential gear. In their modern incarnation the descendent of the humble walking stick has evolved considerably, designed to aid the user in many ways, from aiding comfort to increasing longevity.
The Case for the Defense
“Don’t be ridiculous!” I hear you cry, “I can walk very well on my own two feet!” That may well be true, but wouldn’t you like to walk faster, for longer, and feel less tired at the end of the day? Wouldn’t you like an upper-body workout as well as the lower-body one? Wouldn’t you like to extend your trekking career as long as possible without the inevitable knee degeneration that accompanies repeated impact stress? All joints, including hips and ankles, will suffer from the pressure of combined body and pack weights over long distances.
The Benefits
The benefits of a single pole are obvious enough: an extra point of contact with the ground is a big help for balance, but that’s where the advantages end. Poles are designed to be used as a pair and using two is many times more advantageous than using one. Similarly, you may already be using a wooden pole hewn from a convenient branch on a
memorable trek, such as those whittled by guides on Kokoda or Kilimanjaro. Sturdy and stylish these may be, but they are also heavy, infl exible, and rough – the opposite of a custom manufactured, ergonomically designed tool.
Construction
Modern poles are lightweight and comfortable to use, and come with many mechanical variations. The differences to consider when choosing a pole are listed below.
Weight and shape
Saving grams is crucial to enhancing comfort on any grade of hike, and poles are no different. The lightest models are under 200g each, but you must be careful not to sacrifice strength for weight. Poles are rated by how much load they can safely carry, e.g. <90kg or <140kg. The shape and diameter of the shaft determine the strength, and it
may be necessary to consider wider or elliptical poles should a large man be carrying a heavy pack over long distances. The material used in construction is usually an aluminium alloy or carbon fibre.
Locking mechanism
Most poles come with three telescoping shafts, and there are two main methods for
locking them in place: twist-locks and flick-locks. The former are a lighter mechanism which is as easy as tightening or loosening a threaded screw. The latter are slightly more bulky but are often thought to be more reliable and less prone to damage. Both can be used with gloved hands although flick-locks are easier to adjust, especially in extremely cold conditions.
Antishock
Some poles are fitted with an antishock mechanism: a damper spring which reduces impact stresses on the wrist when walking on hard-packed trails or rocky terrain. On the twist-lock poles this spring is located at the top of the lower shaft, and on flick-lock systems, where that is not possible, the antishock is located in the handle.
Grip material
The most basic poles include a hard rubber handle, which performs perfectly well but can be uncomfortable in hot weather when the user’s hands may become sweaty. (The use of fingerless cycling gloves can help combat this effect and also help to protect the top of the hand from sunburn). A better material for the grip is dense foam, which absorbs moisture and is softer to the touch. The most comfortable material is cork, which does both very effectively. Some models boast increased foam area below the handle; this is useful for gripping lower on steep ascents without needing to adjust the pole length.
Grip angle
Some poles are designed with the handle at a positive angle to the shaft, usually between 5° and 15°. Models with a lesser angle will plant the tip parallel to the walker’s gait, whereas a larger angle will plant the pole in front of the foot. Both angles will leave your wrist in a neutral position through the step, thus reducing the impact felt in the joint when placing the pole. An ergonomic angle is a useful device for those with very sensitive knee joints or for walkers tackling steep downhill tracks where they will need to brake often or suddenly.
Correct usage
The poles are designed to swing with the natural rhythm of a walker’s arms, i.e. opposite to the gait. Therefore, the right pole is planted in unison with the left foot. This may feel strange for a short time but soon becomes a natural movement. Walking poles are designed to be used in a way similar to ski poles: your hand should be positioned up through the handle webbing loop and then gripped around the handle with the webbing sandwiched between your palm and the handle. The pole should become an extension of the arm, though it is wise to remember this when scratching your nose! Length can be increased or decreased when attempting steep descents or ascents, respectively.
Pole etiquette
Remember to be aware of hikers behind you and minimise any wild arm swinging which may cause them injury. More than once I’ve had to duck quickly to avoid an arcing carbide tip which could have done me serious harm. If you have decided to give yourself a rest from using the poles then remember to carry them with the tips facing forward. Rubber tip caps are available which reduce damage to the trail such as scratches on rock and perforation of the soil. Thousands of pole tip punctures can render a section of track unpleasant to the eye, and indeed many official trails, especially in the States, enforce mandatory tip usage to protect against such wear and tear. Rubber also has the benefit of reducing the repetitive tapping noise of metal on rock.
Now you are fully equipped with all the information you need to choose the most suitable set of poles to save your joints, increase your stamina and lengthen your trekking life


